Windows
6 minute read
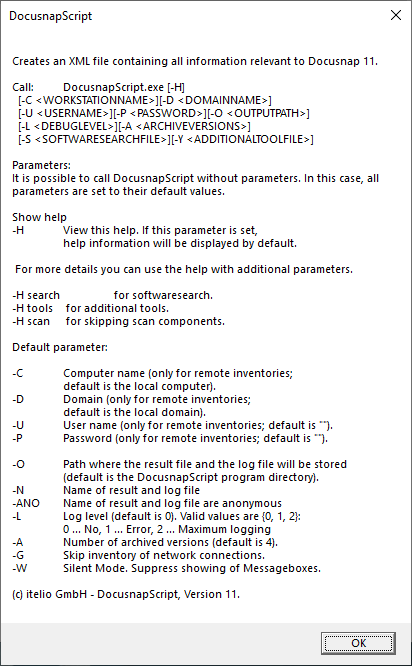
After a Windows system has been scanned, DocusnapScript.exe will generate an XML file that contains all collected data. You can later import this XML file manually to Docusnap or have it imported by the Docusnap Server automatically.
During the installation of Docusnap, DocusnapScript.exe will be stored in the Tools folder of the application directory. To execute DocusnapScript.exe, no additional files are required.
Parameters:
C: Sets the name of the workstation.
D: Sets the name of the domain where the system to be scanned is located.
H: Opens the help screen.
L: Sets the debug level to be used during the inventory scan. The following debug levels are available:
1: Errors and function calls will be logged.
2: The entire program flow will be logged.
O: Sets the path where to generate the XML file. If the process creates a log file, it will be stored in this path.
Examples:
If you run the script on the system you want to inventory, no additional parameters are required. You can specify the location of the XML file using the -O parameter.

If you intend to use the script for an inventory scan of a remote system, you can specify the system to be scanned using the -C and -D parameters.

This command will scan the WKNE006 workstation in the intern.local domain using debug level 2. The XML file will be stored in the C:\DocusnapScripts directory.
Software and File Search
The Docusnap feature enables you to inventory files that cannot be scanned through the Windows inventory process. You can include a Software Search command in the Docusnap script. To use the Software Search feature, you need to create an XML software list manually.
With the help of the Software and File Search search, Docusnap offers an additional feature to inventory specific files on the file system of Linux, Mac and Windows systems, which cannot be captured via the Windows inventory. The files found are made available for evaluation in Docusnap in different ways depending on the categorization (file search Linux, Mac and Windows or software search Windows). The software and file search can also be used when running the Docusnap script. To use the software and file search, an XML list must be created manually.
The XML file must have the following structure:
<?xml version="1.0" encoding="UTF-8" ?>
<Search>
<SearchItem><!--File Search-->
	<Name>log4j</Name>
	<FileName>*log4j*</FileName>
	<FileSize>0</FileSize>
	<Category>1</Category>
	<IncludeExcludeList>
	<SearchPath>
	<IncludePath>c:\windows</IncludePath>
	<ExcludePath></ExcludePath>
	</SearchPath>
	<SearchPath>
	<IncludePath>c:\temp</IncludePath>
	<ExcludePath></ExcludePath>
	</SearchPath>
	</IncludeExcludeList>
	<OnlyFirstMatch>true</OnlyFirstMatch>
	<UseSystemDrive>false</UseSystemDrive>
</SearchItem>
<SearchItem><!--Software Search-->
	<Name>Notepad</Name>
	<Version></Version>
	<Publisher></Publisher>
	<FileName>notepad.exe</FileName>
	<FileSize>0</FileSize>
	<ModifyDate></ModifyDate>
	<SearchPath>c:\temp</SearchPath>
	<Category>0</Category>
</SearchItem>
</Search>
Make sure to specify the filename correctly or use a wildcard character (?,*).
Only either excluding or including paths are possible for the search
The tags for Category define with 1 the file search, with 0 the software search
The tags OnlyFirstMatch define whether only the first found result should be displayed (true), with false all found results are recorded
The tags UseSystemDrive determine whether only the system partition should be searched (true) or all partitions on the system (false)
If a wrong file size is specified, the requested file will not be found!
If one of the optional areas is not specified, the notation (
The search is downward compatible so existing versions are not affected. The previously used XML files for the software search can still be used.
<SoftwareItem>
<SoftwareName>My New Software 1</SoftwareName>
<SoftwarePublisher>Microsoft</SoftwarePublisher> <!-- optional-->
<SoftwareVersion>1.0 Beta</SoftwareVersion> <!-- optional-->
<FileName>notepad.exe</FileName>
<SearchPath>C:\Windows</SearchPath>
<FileSize>193536</FileSize> <!-- optional byte-->
<ModifyDate>01.01.2016</ModifyDate> <!-- optional-->
</SoftwareItem>
<SoftwareItem>
<SoftwareName>My New Software 1</SoftwareName>
<SoftwarePublisher /> <!-- optional-->
<SoftwareVersion /> <!-- optional-->
<FileName>notepad.exe</FileName>
<SearchPath>C:\Windows</SearchPath>
<FileSize /> <!-- optional byte-->
<ModifyDate /> <!-- optional-->
</SoftwareItem>
If one of the optional parameters is not specified, use the notation shown in the example to the left (<SoftwarePublisher />).
If you specify a wrong file size, the desired software will not be scanned!
To use the software list in the DocusnapScript, use the following command:
DocusnapScript.exe -S <path><filename.xml>

If a defined software product is found during the execution of the script, its data will be stored in the results XML file. When you import the XML file into Docusnap, this data will be imported as well.
Additional Tools
Through the use of additional tools, further information about a Windows system can be captured during the inventory. The execution of the additional tool can also be started as part of the Docusnap script. To execute the additional tool, an XML file with the required information must be created.
The XML file must have the following structure:
<ToolInfo>
 <Url>systeminfo.exe</Url>
 <Parameters> </Parameters>
 <ResultFile>systeminfo.txt</ResultFile>
 <OpenWith>notepad.exe</OpenWith>
 <Description>Systeminfo</Description>
 <ToolType>0</ToolType>
 <Timeout>10000</Timeout>
 <ExecuteRemote>false</ExecuteRemote>
</ToolInfo>
To execute the additional tools in DocusnapScript, use the following command: DocusnapScript.exe -Y <path><filename.xml>

Data collected during the execution of additional tools as part of the script, is stored in the result XML file. By importing the XML file into Docusnap, this data will be imported as well.
Select Windows Components for Scan -Z
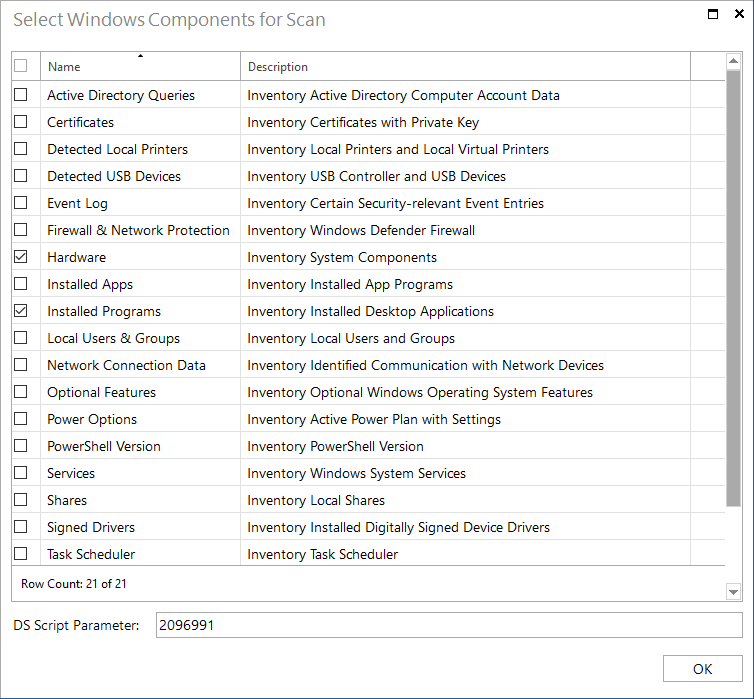
Since version 11 Docusnap provides the possibility to select the components to be inventoried in the Windows scan (software, updates, services etc.). This selection of components can also be done when using DocusnapScript.exe.
The call is made via the parameter -Z <number>\

The necessary number can be determined in two ways:
1.Windows scan wizard
Switch to one of the Windows Scan Wizards (AD or IP). In step 3 you will find the Select Components button. Select the components to be inventoried and note the DS Script parameter.
2.Manual enumeration
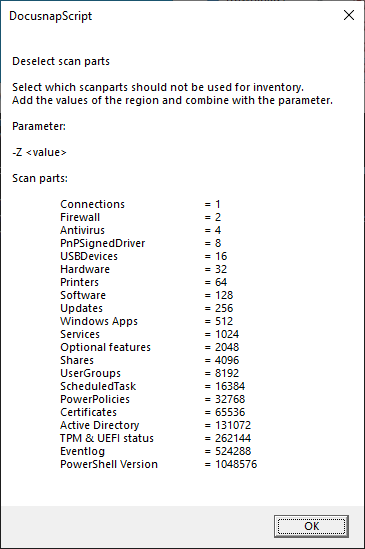
Start the DocusnapScript.exe help specific to the scan components with: DocusnapScript.exe -H scan.
Now you can specify the appropriate components by adding up the numbers behind them.
Anonymize filenames -ANO
The .XML files created by DocusnapScript.exe are named as follows.
- Computer name
- User or system that performed the execution of DocusnapScript.exe.
- Date and time of execution Example:
VPC-SDA_VPC-SDA_admin_20210323090358.xml
Running DocusnapScript.exe with the -ANO parameter will anonymize the filename.
Example:
383ee2d1-46ae-4cbc-b2f9-b4dc437bf911.xml
